



Personal Tracker User Manual
1. Technical Parameters
1.1 Working Voltage:3.8V DC
1.2 Battery Capacity:1450 mA/H
1.3 GSM Band:850/900/1800/1900MHz
1.4 GPRS:Class12,TCP/IP
1.5 GSM Antenna 50Ωlinear polarization passive PiFA antenna
1.6 GPS Frequency:1575MHz 20Channels
1.7 GPS Tracking Sensitivity:-159dBm
1.8 GPS Capturing Sensitivity:-144dBm
1.9 GPS Locating time:cold start≈28s(Open sky)
Hot start≈2s(Open sky)
1.10 GPS precision:10m(2D RM)
1.11 GPS Antenna:50Ωcircular polarization 360°active ceramic antenna
1.12 Working Temperature:-20℃~+70℃
1.13 Working Humidity:20%~80%RH
1.14 Measurement:80×50×12 mm
2:Characteristics
2.1 Online web platform, the historical and current location can be checked.
2.2 E-fence function。
2.3 Hijack alarm,9 SOS numbers can be preset。
2.4 remote voice monitoring。
2.5 Low battery alarm。
2.6 Inlayed 3D accelerator,moving and static state, energy smart.
2.7 Change the time interval of uploading automatically according to the speed.
2.8 Admin checks the altitude and longitude and location information by texting.
2.9 Four LED signal indicators: blue GSM LED, green GPS LED, red SOS and charging LED。
2.10 AGPS solutions,shorter locating time,higher precision.
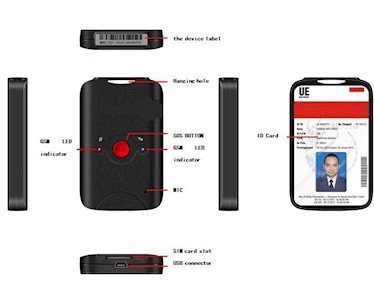
3:Appearance Diagram
3.1 Appearance Diagram
|
||
 |
||
|
SIM card slot |
|
USB connector |

3.2 Charging Diagram

4. Status Indicator
4.1 Green LED(GSM status indicator)
When GSM signal is normal,the green LED glistens (0.3S/2S). When uploading GPRS data,the LED glistens quickly. The LED glistens slowly when in no signal (2S/5S)。
4.2 Blue LED(GPS status indicator)
When GPS signal is normal,the blue LED glistens. When GPS just starts but still not locates, the LED is in constant glow. The LED is off when GPS closed.
4.3 Red LED-SOS alarm switch (SOS/charging status indicator)
Push SOS key for 3 seconds, the LED will be in quick glow(0.3S/0.3S). The device will be in SOS status. When the device is in charge, the red LED will be glisten(0.2S/2S).The LED glistens slowly in low battery(0.5S/4S),and will in constant glow after charging.
5. Usage
5.1 Preparation
5.2 Product check: open the packing box and check the device’s model and accessories. If wrong model or short of accessories, please contact the seller.
5.3 SIM card selection: the device needs inserting a GSM SIM card. Please refer to the seller’s advice on choose of SIM card.
5.4 SIM card installation (as followings).

|
||||
|
||||
|
Use the tool to tip the SIM card into the card slot |

5.5 The device will be in working status when inserted SIM card. And the device will be power off when taking off the SIM card.
Note:The SIM card can not be inserted in wrong way;
The SIM card must be with GPRS function and enough deposit;
If your SIM card requires input PIN, please close the PIN input function of your mobile phone.
6. User Settings
|
1) Administrator number set |
||
|
Text command |
Parameter |
Sample |
|
Admin Add |
710#number# 711#number# |
710#13500135000# 711#13800138000# |
|
Admin Del |
D01# D02# |
D01# D02# |
|
Command Description |
1) admin number can control the oil and power and resume factory settings 2) Only two numbers can be admin number. 3) Change admin number must resend the command. |
|
|
Command Feedback |
Successful Setting:Add admin account 1 OK! |
|
|
2) View administrator number |
||
|
Text command |
Parameter |
Sample |
|
View |
901# |
901# |
|
Command Description |
This directive is used to view Device Manager number.
|
|
|
Command Feedback |
Successful Setting:Admin1: Admin2: |
|
|
3)Authorized number set |
||
|
Text command |
Parameter |
Sample |
|
Authorized Add |
101# number # 102# number # 103# number # |
1:101#13800138000# 2:102#12345678912# 3:103#12345678912# |
|
Authorized Del |
D11# D12# D13# |
D11# D12# D13# |
|
Command Description |
1) Authorization number for SMS control oil. 2) only three numbers to set the authorization number 3) change the authorization number needs to delete the previous number
|
|
|
Command Feedback |
Successful Setting:Add Authorization account 1 OK! |
|
|
4) View authorized number |
||
|
Text command |
Parameter |
Sample |
|
View authorized |
C10# |
C10# |
|
Command Description |
This directive is used to view the equipment authorization number |
|
|
Command Feedback |
Successful Setting: Authorization 1: Authorization 2: Authorization 3: |
|
|
5)APN |
||
|
Text command |
Parameter |
Sample |
|
APN Setting |
802#username#password |
1:802#intenet#123#123#
|
|
Command Description |
APN differs according to the local telecom operators. For example:APN request password,please refer to Sample1,and Sample2 for no password. |
|
|
Command Feedback |
Successful Setting:SET APN OK! |
|
|
6)SERVER |
||
|
Text command |
Parameter |
Sample |
|
SERVER Parameter |
803#SERVER # port# |
803#222.217.240.243#8011# |
|
Command Description |
Change the IP and port when move to a new server port:10~65535 1 is domain and 0 is IP; |
|
|
Command Feedback |
Successful Setting:set IP OK! |
|
|
7) View SERVER |
||
|
Text command |
Parameter |
Sample |
|
CIP Parameter |
CIP# |
CIP# |
|
Command Description |
This directive is used to set the IP address and server platform port |
|
|
Command Feedback |
IP:222.217.240.243 PORT:8011# |
|
|
8)VIBRATION |
||
|
Text command |
Parameter |
Sample |
|
VIBRATION Parameter |
761#2#,alarming way#
|
1)761#2#3# |
|
Close VIBRATION |
765# |
765# |
|
Command Description |
the sensitivity value of the vibration is from 1 to 5,1is the most sensitive and o is close. Alarming ways: 1, calling 2, texting, 3 calling and texting. Must set the center number and receiving number. |
|
|
Command Feedback |
set vibration alarm level,OK! |
|
|
9) FACTORY |
||
|
Text command |
Parameter |
Sample |
|
FACTORY Parameter |
940# |
1)940# |
|
Command Description |
Restore the factory setting Only center number can initial this function Factory setting will recover to the original setting |
|
|
Command Feedback |
Successful Setting:FACTORY OK! |
|
|
10) Upload frequency |
||
|
Text command |
Parameter |
Sample |
|
TIMEER Parameter setting |
730#uploading interval# |
730#30# |
|
Command Description |
Time scope: 30~180seconds; 30~180,means time interval;the default value is 60seconds! |
|
|
Command Feedback |
Successful Setting:Set upload time, ok! |
|
|
11) Low power alarm switch settings |
||
|
Text command |
Parameter |
Sample |
|
STATIC |
750#shapl# |
750#1# 750#0# |
|
Command Description |
This command is used to open or close the Low battery alert administrators when the function is enabled by default state.
|
|
|
Command Feedback |
Successful Setting:Set low power Switch ok! |
|
|
12) Electronic fence set |
||
|
Text command |
Parameter |
Sample |
|
STATIC |
FNECE#Latitude #Longitude #Radius# |
FENCE#22.530530#114.02223 #5#
|
|
Command Description |
This command is used to open or close the Low battery alert administrators when the function is enabled by default state.
|
|
|
Command Feedback |
Successful Setting:Version information IMEI
|
|
|
13)STATIC |
||
|
Text command |
Parameter |
Sample |
|
STATIC |
731#time interval# |
731#5# |
|
Command Description |
Time scope:1~60 minutes;The device has3D transmission and the default time interval are 5 minutes. |
|
|
Command Feedback |
Successful Setting:Set static upload time ok! |
|
|
14) Close Upload |
||
|
Text command |
Parameter |
Sample |
|
command |
732# |
732# |
|
Command Description |
Close Upload |
|
|
Command Feedback |
Successful Setting:Close upload GPRS information ok! |
|
|
Resume upload |
MUP# uploading interval# |
|
|
15)WHERE |
||
|
Text command |
Parameter |
Sample |
|
WHERE |
988# |
988# |
|
Command Description |
Check the longitude and altitude and other information of the device |
|
|
Command Feedback |
Reply with longitude and altitude, speed and IMEL. |
|
|
16)URL |
||
|
Text command |
Parameter |
Sample |
|
WHERE |
666# |
666# |
|
Command Description |
Check the location link of Google map |
|
|
Command Feedback |
<Datetime:12-07-05 13:21:30> http://maps.google.com/maps?q=N22.540885,E113.95265 |
|
|
17)GMT |
||
|
Text command |
Parameter |
Sample |
|
GMT |
801# location time # |
801#E8# |
|
Command Description |
The default time zone is Beijing time. If time zone need revised, please operate according to the above command. |
|
|
Command Feedback |
Successful Setting:Set time zone ok! |
|
|
18)RESET |
||
|
Text command |
Parameter |
Sample |
|
RESET |
930# |
930# |
|
Command Description |
Reset the device |
|
|
Command Feedback |
Successful Setting:Reset system, ok! |
|
|
19)LANG |
||
|
Text command |
Parameter |
Sample |
|
LANG Parameter |
920#1# |
1) 920#1# Chinese 2) 920#2# English |
|
Command Description |
;When check the location, it will reply the Chinese location in Chinese language setting; while reply the URL link when in English language setting. |
|
|
Command Feedback |
Successful Setting:SET LANG OK! |
|
7. Check the Location by Texting
7.1 Check the longitude and latitude by texting.
Admin number or family mobile phone number can text to the device number and the device will open he GPS and uploading the longitude and latitude, time, speed and direction data. If the locating fails because of environment, the device will send the last GPS location information.
7.2Call the device number to check the longitude and latitude
Admin number or family mobile phone number can call the device number and hang up after connecting and the device will open he GPS and uploading the longitude and latitude, time, speed and direction data. If the locating fails because of environment, the device will send the last GPS location information.
7.3 Check the location by texting.
Admin number or family mobile phone number can text to the device’s number and the device will text back the current location information.
9.SOS
9.1 Users press SOS key for over 3 seconds and SOS LED will glisten quickly(0.3S/0.3S). The device will open the GPS and uploading the location data every 15 seconds until the SOS alarm is closed. You can close the SOS alarm by texting or online platform.
9.2 Meantime, the device will call SOS mobile phone number、admin number, family mobile phone number until there is person answering it(the call will be recorded and saved on the platform).
9.3 The monitoring center will open a popup window of alarm. The monitoring center can close the popup window after dealing with the alarm. The system will send a command to remove the alarm and the device will close the SOS alarm after receiving the command.
10. Trouble shooting
The device is not online or offline on the web platform.
10.1 First, please check the three LED working state. If possible, you can call the device’s number to check.
10.2 if not connected,the device maybe out of signal. Please check the SIM card working state or go to the open sky to check.
10.3 If reminding the device SIM card is out of deposit, please make deposit by the telecom operator.
10.4 If connected and the device’s SIM card with enough deposit, please check with the operator that the status of the SIM card’s GPRS function.
10.5 The device power off when calling it.
10.6 Please the offline area(individual offline or group offline)in order to check the network of the operator.
10.7 When the receiving of GSM signal is abnormal, please check the SIM card installation; or the location is out of GSM signal (like in basement).
10.8 The green GSM LED does not glow after inserting the SIM card; please check the power of the device by charging it.